
.jpg)
Welcome to our kitchen!
Let me introduce you to our kitchen, in it’s very nearly completed form! We took several months off from doing any serious work on the house after finally getting the lady’s office and the kitchen mostly done. But as we were hosting Christmas this year, we realized we really needed to get some more work done, which meant finally getting the kitchen countertops in (plus we knocked out some trim and built a fireplace mantle).
This is a big, big post with lots of pictures and words, so hit the read more link to see it all. I’m including a lot of information about how we handled the countertops, since I had such a hard time finding good information when I decided to embark on this little journey and hopefully our experiences can help someone else who is considering copper countertops.
First of all, lets compare what we had with what we have.
.jpg)
This is what the kitchen looked like when we bought the house.
.jpg)
This is what the kitchen looked like when we bought the house.
And this is what our kitchen looks like now!
The entire kitchen was completely gutted and we just started over. The cabinetry was falling apart, it had been so badly abused over the years (it was decently built stuff originally). The windows belonged more in a summer cabin, not a north facing wall in a house that gets viscous cold north winds. We got ridiculously lucky and found exactly the window that we wanted at the Habitat for Humanity store in Kansas City. It was a brand new Pella, 3 separate panes. The center pane is fixed and each of the outside panes open. It really opens up the view out of the back of the house. We sacrificed some counter space to add a back door. The door currently just goes to a 6 foot drop, the deck will come later. Originally there was a 3 foot opening between the kitchen and the living room. We tore most of that wall out and made it a 12 foot opening (leaving a little stub wall on the east side). The little stub wall forms one side of a washer/dryer/pantry enclosure. There was a door from the kitchen into a bedroom, which we walled off. That bedroom eventually became my office, and it now has an entrance from another room. The kitchen got the same white oak hardwoods that are present in the rest of the house. The countertops will get addressed in detail below.
The only thing left for the kitchen is to get a range hood up and there is still some trim that needs done. I think down the road I’m going to build a movable center island with a butcher block top, but it’s not a top priority right now.
Like much of the rest of the house, it all feels radically different from what was originally here.
Now, on to the countertops.
We talked about a variety of surfaces for countertops, pretty much anything you can imagine (granite, tile, Formica, the fake granite stuff). But early on, I had run across some pictures of copper countertops that I became thoroughly enamored with and couldn’t get out of my head. Copper is definitely a non-standard countertop material, very few professionals will work with it because of the rarity. Granite was out pretty much due to cost. But, after running the numbers, copper was comparable to pretty much any other surface except for very cheap tile. The total cost for the job was less than $900 for all the material and new tools.
Copper as a countertop can be handled in a couple of different ways. It can be left raw, in which case it is incredibly anti-microbial and a great food surface. But, raw copper will develop a patina over time, meaning that its look will constantly be changing and it requires some different kinds of maintenance versus more traditional countertop materials. Its changing look is what makes it an attractive surface to many people. You can also seal it, which means it doesn’t have the anti-microbial benefit anymore, but its look won’t change and the care and maintenance is different. We opted to seal ours since we had a pre-applied patina on the copper.
Copper should also not necessarily be considered a lifetime material. It will dent. It will age. If you’re interested in copper countertops, you need to want a top that will develop character as it ages. If you want it to look the same 5 or 10 years from now as it does today, look for another material. Most estimates I found figured that a copper countertop is good for about 15 years (give or take a few).
I’m going to detail our steps here, as I did have a lot of difficulty finding good information on how to do copper countertops. I am deeply indebted to this forum thread, which had more information than any other source I could find online. ColorCopper also has a great video on adhering copper with contact cement. I wish I had links to everywhere that I looked to give credit to the dozen or so sites that I consulted during this, but unfortunately I didn’t bookmark them all.
Oh, and I am not an expert in copper countertops and offer this only as a description of my experience. If you choose to follow all or any of my steps and it goes horribly wrong, it’s not my fault. Do your own research prior to starting a job like this. Also, I apologize that some of the steps do not have pictures. I took as many as I could, but there were some spots were every available hand was actively being used to do something. The job was mostly handled by two people (the lady and I). Don came out the day we put the big sheets down and the extra set of hands was super handy.
The steps we followed:
1. We built the countertop base out of doubled up 3/4 inch MDF, for an inch and a half total thickness. We liked the look of the thicker counter, and by doubling it up it let us fully assemble the big run with the L turn as a single piece. Our tops are 25 inches deep, so we couldn’t just split a 4×8 sheet of MDF in half to double them up. You’ll see that there is a gap in the bottom layer in the middle. By leaving a little gap in the middle on the bottom side, it let me conserve material, otherwise I would have needed 4 total sheets of MDF instead of 2.
.jpg)
I’m going to keep complaining about this, doing this during December was stupid. It’s definitely a spring/summer job.
.jpg)
We built the base out of doubled up 3/4 inch MDF.
.jpg)
We built the base out of doubled up 3/4 inch MDF.
.jpg)
We sanded the edges to get them nice and smooth.
A note: We knew we had extra copper and we had a variety of building materials left over from other projects, so we experimented with folding edges and corners with some scrap material. I highly recommend this if you have never worked with copper before, as you do not want to learn as you go. My practice corners are a lot rougher than my final corners. I also experimented with how we were going to handle the one seam we would have. Our copper had a pre-applied patina, which a light sanding took right off, so that was out of the question. We also tried plywood and concrete board as base materials, but were not happy with the texture they gave to the copper. MDF is nice and smooth and we felt gave the most attractive look after the copper was glued to it.
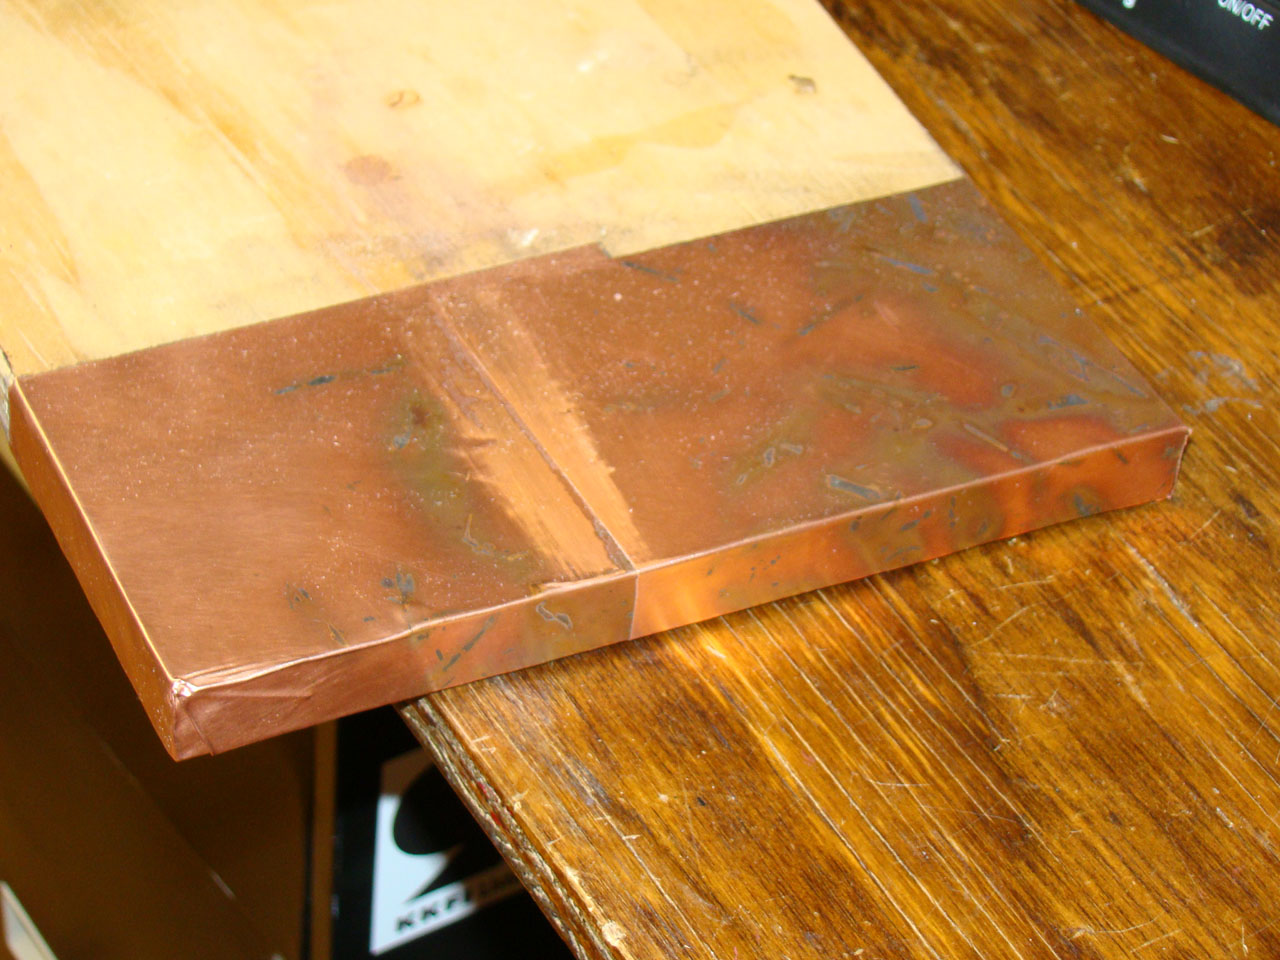
This is one of the scrap pieces I practiced on.
2. To actually apply the copper, you don’t need a lot of tools. We used a 3 inch laminate J-roller, contact cement, a small paint roller, a paint brush and metal shears. For contact cement, we used the DAP brand in a red can. It says it’s not appropriate for copper on the label, but I found multiple testimonies of people using it on copper just fine, so we went with it. DAP in the green can will not adhere to copper well and should not be used. I also found a variety of people who use Better Bond Copper Adhesive. I discovered this stuff too late to order and get the job done in the timeframe we had. DAP is almost always available locally.
.jpg)
It doesn’t take a bunch of tools to do this.
.jpg)
The most important tools you need.
3. We got our copper from Metal by the Foot in Kansas City. We got a 16 foot by 3 foot sheet, which was plenty to do the full counter and the backsplash. Most major metros should have a dealer that has copper, but it can also be found online at many places. The copper we used is on the thin side for countertops, so it may be more prone to denting over time, but we knew that going in. Going with a thicker copper would have required ordering it and would have doubled the cost of the job. You can usually find copper sheets either raw, or with a pre-applied patina. A patina is the unique discoloration and aged look that copper develops over time. We opted for a kind of burnt bamboo look, though we considered several other varieties. The bamboo still had a lot of raw copper throughout it, which is one of the reasons we went with it. Some of the other patinas really obscure the raw copper, even though they are attractive in their own way.
.jpg)
We favored the bamboo patina over all the other different varieties.
4. To mount the copper to the MDF, you coat both surfaces with contact cement and let them stand for about 15 minutes. Contact cement has some potent fumes, so you need a well ventilated area. We, unfortunately, were doing this during winter, and so had to open our house up to some pretty cold temps in order to get it aired out well. I don’t think I would ever do this during the winter again, definitely would wait until spring or summer.
If you’ve never worked with contact cement, once you stick two surfaces together, they are stuck that way. There is no sliding it around or adjusting, so you need to get it right the first time. For the small piece by the stove, we were able to just drop it straight down and get it right. For the long run, we used dowel rods spaced out every few inches to suspend the copper above the MDF as we got everything lined up. Then we removed the dowel rods in the middle of the run first and worked our way out from there. We did this with the counter sitting near its final location (just pulled out from the wall a bit), as the big long L run was too heavy and unwieldy to move easily.
You can press the copper down by hand first, then use the laminate roller to thoroughly press it to the MDF, which takes out any air bubbles and gives it that nice smooth finish. With the laminate roller, work from the middle to the edges of the top, to drive any bubbles out. If you haven’t got it decently pressed down flat prior to starting rolling, you can develop crinkles which are impossible to remove. We ended up developing a few small crinkles as we went over the sink hole. Because of their location, they are usually covered up by our coffee pot, but knowing now how to handle the copper going over that hole, I think I could get it done without a single wrinkle developing.
.jpg)
We applied the contact cement to the copper on the floor.
.jpg)
Dowel rods will suspend the copper from the countertop as we position it.
.jpg)
Dowel rods will suspend the copper from the countertop as we position it.
.jpg)
This is me rolling out the copper on the backsplash. Unfortunately we didn’t get any pictures of rolling out the big sheet (because all hands were occupied).
.jpg)
This is me rolling out the copper on the backsplash. Unfortunately we didn’t get any pictures of rolling out the big sheet (because all hands were occupied).
5. Now you’ve got the big surface area covered and it’s time to do the edges and corners. Our copper was thin enough that I could hand fold it over the edge, then use the laminate roller to get a really nice, crisp edge. Thicker copper may require a metal brace to make the folds, which also may need to be done ahead of time. We had to double up the contact cement on the edges, as the edge of the MDF soaked up the first layer. We fully coated the top and edge first, then after the sheet was attached to the top, went back and added another coat of contact cement to the edge.
.jpg)
You may want to do two coats of contact cement on the edges, as it may try to absorb into the edge.
We folded over about a half inch on the bottom, which was plenty. Again, I folded it by hand, and then got the edge good and crisp with the roller.
.jpg)
We just folded over about a half of an inch or so on the bottom.
We did not wrap copper around the back edge, as we didn’t see any reason to do so. The backsplash would overlap enough to cover and seal it. Saved a lot of folding, gluing, etc.
6. I’m going to repeat this: Practice your corners before doing the final piece. We settled on a type of fold that leaves a little seam on each corner edge, but the seam faces away from the dominate viewing angle, so it’s virtually invisible. First, we would fold down the side that is going to be seen the least, leaving just a little extra right at the corner. That little extra was then folded around the corner. Then the more visible edge was folded straight down, overlapping the little extra that we just folded, with its edge right at the corner. The corners will take a bit of time, as you’re going to have to apply contact cement to every place that is being adhered down, and some of the folds will not have been covered the first time you put cement everywhere.
I don’t know if that description makes any sense without seeing multiple pictures of the process, unfortunately this is one of those spots where all hands were busy. I hope it does.
.jpg)
This is how we folded the corners, again it’s on the backsplash as we didn’t get pictures of this part on the big sheets.
7. I found several talented people who were able to form the backsplash and countertop out of a single piece of copper. I did not feel that confident doing this the first time, so the backsplash is a separate piece. If I had planned better, I could have made it out of MDF too, but I didn’t leave enough MDF scrap. So rather than buy another sheet of MDF and waste most of it, we just got some 1×4 pine (actual dimensions 3×4 inch by 3 1/2 inch). Mounting the copper to the backsplash went just like the big sheets, only there were more corners to deal with.
.jpg)
The backsplash goes together just like the full top.
8. After the countertop and backsplash were all adhered, we used lacquer to seal all of it. We tried polyurethane, but it altered the color too much. The lady spent two days applying the lacquer, four coats total. Lacquer has even worse fumes than contact cement, and after two coats we had to evacuate the house for a few hours and let it air out. Again, I’m never doing another job like this in winter.
Had we gone with just raw copper, I don’t think we would have sealed it. I would have just let it age and develop its own patina over time.
.jpg)
The lady seals the top with laquer.
.jpg)
The lady seals the top with laquer.
9. We used L brackets to secure the countertop to the cabinetry.
10. We just used LiquidNail to attach the backsplash to the wall. The challenge here ended up being that the pine wasn’t perfectly straight (when is it?). The short runs were easy, but the long run did not want to sit flush against the counter top. So we improvised, holding down each end and the middle with a variety of stuff to keep it in place. We left it like that for about 18 hours, which was plenty of time.
.jpg)
We had to build some custom clamps to hold everything in place on the big long backsplash.
.jpg)
We had to build some custom clamps to hold everything in place on the big long backsplash.
11. The final step was to put the sink in and silicone the edge between the backsplash and countertop.
.jpg)
We were able to cut out the sink hole with just a good pair of scissors.
.jpg)
Final job was to seal everything up with silicone.
And that was it. It took about a full week to do the whole job from start to finish, but that included waiting for the cement and lacquer to cure, needing to actually run our business and we took one day off because the outdoor temp dropped way too much to open the house up that day.
And this is what it ended up looking like!
.jpg)
And this is what it ended up looking like!
.jpg)
And this is what it ended up looking like!
.jpg)
And this is what it ended up looking like!
.jpg)
We had one seam in the actual top. We did not solder or weld it. We managed to butt up two machined edges perfectly and the lacquer provides the seal.
.jpg)
And this is what it ended up looking like!
.jpg)
And this is what it ended up looking like!
If you’ve found this post because you were looking for information on copper countertops, please feel free to post any comments or questions here and I’ll address them to the best of my ability.
Tags: copper · copper countertops · countertops · house · kitchen · remodel18 Comments - Follow the string
18 responses so far ↓
O_O
o <- eyes wide open face?
WOW! Man that is BEAUTIFUL! I can’t believe y’all did all yourselves!! That is stunning brother, very impressive. I don’t know if I should show the wife, she’d want it all and we’re really tight on funds now! I am so amazed with what y’all are doing. I bet your sense of accomplishment and self-worth is shooting through the roof right now!
Having spent the better part of last year doing my basement from the walls up, I can empathize with this project. You are truly a renaissance man, Court. And the counter top looks great. Our condo in Minnesota has granite tops. They are nice but 1. You can’t see the crud for the texture in the stone and you have to be sure to wipe them down whether they look clean or not; and 2. They get damn cold after a week of below zero temps. I went for cheap with my Ikea basement counters and just bought preformed formica tops at Home Depot for my job. See FB for slide show.
Rick
Rick, I saw the pics of when you got the Ikea cabinets put in your basement. I actually like that style quite a bit. It’s a look I would have considered, but I’m not sure it would have matched well with the design of the rest of the house.
I’m almost out of big projects inside the house, it’s all down to finish work now. Come spring/summer, the next big projects are all outside, building a deck and making a trail down to the river.
Oh, and you can take our cold too. Looking at some single degree/negative days this week. My floors are cold.
Hey guys, you project looks fabulous! This is Don over at http://www.ColorCopper.com. I’m sad that you did not purchase from me…LOL, just kidding, Andy over at Metal by the Foot is a friend.
Would you mind if we used some of your photos to showcase the Bamboo countertop on our website since you did such a great job? Your DIY instructions are excellent by the way.
Don, thanks for the compliment. Drop me a line at courtneyfarr @ gmail dot com and we can talk about using the pics.
Looks awesome, how about I place the copper sheet on top of the existing laminate countertop I have? What could go wrong?
Is the glue not going to stick?
I don’t see any reason why it wouldn’t work, though I would definitely test it out before I committed to buying all the materials for the full job. I would want to make sure that the cement would bond the two surfaces well. I also think it’s a bit easier to work with the copper if the countertops aren’t attached, where you can move or slide them around, though it wouldn’t be impossible to do with them already attached, just a little more challenging.
Love the idea- I’ve been exploring different countertop ideas for a gut kitchen remodel & I think I’ve struck gold! I’m curious though, how easy/difficult it would be to (smoothly) apply the copper to rounded counter edges?
I think applying it to a rounded edge would certainly be possible, it would depend a great deal on the exact edge. I would definitely practice on a scrap piece prior to doing the big project. I thought about doing rounded edges, but I was on a time frame to get the project done prior to hosting Christmas dinner, and going with square edges was much faster for me.
Looks great. I’m doing an outdoor patio area and want to sheet my bar top in copper and then build a patio table out of copper. I think I have it down after reviewing the internet carefully (as any good expert would), but your project was one of the few that simply bent the copper over the edge as opposed to using copper bar. Your method is easier, cheaper, and faster… I’m all over that.
Project looks great, and thanks for the idea!
God bless you! I have been research copper tops , and i finally got a great resource from your article! I plan to create a coppertop for our basement bar – this is so great! Thanks again 🙂
Thanks for all the great information! Your kitchen is beautiful. I’ve been researching for a month or so about doing a copper countertop myself. I’m thinking about doing my edges in 1″ glass tiles so I wouldn’t have to roll over the edges. How is your pre-patined and lacquered copper holding up after a year?
Donna,
I’ve been quite satisfied with how the countertop is holding up. A year later, it’s not quite as shiny as it was when it’s brand new, but it still looks great.
I’ve got some additional kitchen pictures to put up soon. This year, for the lady’s Christmas gift, I built a moveable island with a butcher block top and a copper tubing pot rack. They look great and really compliment the room.
So how is it holding up?
Cynthia, please see the comment directly above yours. It’s not as literally shiny as it was when we first installed it, but it still looks great. No dings, dents or scratches to speak of after a year of regular use.
OOps you can ignore that question – I just read through the list of comments below and see that you just answered that very question.
Nice tutorial and I am sure the island is a great addition!
THANK YOU for doing this step-by-step!
Your kitchen looks great; I am so impressed. Your work is an inspiration.
I do have a question. I want to apply my copper to a pre-existing island with a laminate counter top. I want to apply directly to that laminate. I have tried to check every site about this and the info is not always helpful. Do you have any suggestion?
I need something that will work for both surfaces…laminate and copper and perhaps you can tell me about the red-can DAP. Some have also said some Liquid Nails.
(I will also replace sink counters with the butcher block counters; and hope to care for both types of counters enough to let them age gracefully. We’ll see!)
Thanks for any ideas.
Diva
Hi,
I would advise against liquid nails, primarily because of it’s thickness. You would either have to do a ton of work spreading it out, or it’s possible you would end up bending/creasing the copper as you tried to stick it down.
The red-can DAP is really inexpensive. I would just go ahead and try to use it to adhere a small piece of copper to your existing counter, then you can always scrape it off it it works. That’s one of the the things I did while making our counters. I probably adhered 4 or 5 test pieces to learn how quickly they would adhere and how well on different surfaces.
Best of luck!